You’ve been working on your WordPress website so hard, and now you’re ready to launch the brand-new platform to the audience. Or you hired an expert web design agency and are pleased with the results! Wait, mate! The real work only starts.
You can introduce your site to the world. It may have an attractive design and be ready to go. But is this what you wanted when you started building the best WordPress website possible? We are unsure if the site is responsive enough to meet the visitors’ needs and help achieve your goals. You may not know, but here are a handful of points you must take care of post-launch of the site to set yourself up for success.
Below is the checklist of things to do after creating a website оn WordPress. Let’s dive in.
- Set Up Basic Website’s Information (WordPress Permalinks + WordPress Site Title)
- Get WordPress SEO Optimization of Your Website
- Make Sure a Website Is Fast Enough: WordPress Speed Optimization
- Secure a Site with a WordPress Security Plugin
- Set Up Google Search Engine & Google Analytics on WordPress
- Add Email Capture Form to WordPress
- WordPress SMTP: Control Forms Data & Status of Submitted Emails
- Block All Comments On WordPress and Add WordPress Contact Form Spam
- Link Your Social Profiles Widgets to a WordPress Website
- Write a Terms & Conditions and WordPress Privacy Policy
- Add a Cookie Consent or WordPress GDPR Notice
- Summing Up
Set Up Basic Website’s Information (WordPress Permalinks + WordPress Site Title)
Parents first give the baby a name when they have a kid. When you launch your website, aka newborn, do the same.
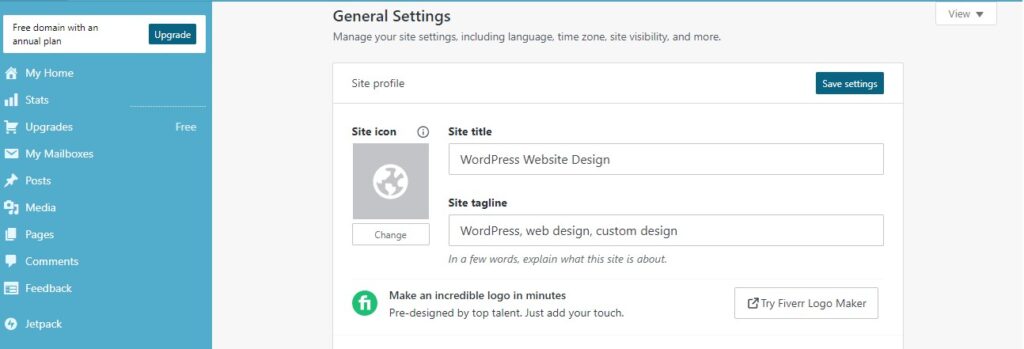
You have to set up a proper name (WordPress site title). Then, you need to customize the site’s taglines and permalink settings. You may wonder: “If the settings by default are fine, why should I do this?” But it is very important if you want search engines to recognize you and rank you correctly when a user queries you.
Go to your WordPress dashboard → Settings → General. Here, you will be able to input the name of your website and add taglines to highlight the main areas of the brand — use only the proper ones that contain relevant keywords. We also recommend adjusting the date and time format to narrow down the search area of your site. It will help you rank higher and get more traffic.

The next step is to change the WordPress permalink structure.
By default, it looks like this — http://yourdomain.com/p=123. Such a format seems simple and easy to remember, but it is not friendly for search engines (and users). Go to Settings → Permalinks → Post name in the URLs. Set up a plain but pretty WordPress permalink name that will represent the content of each page.
Get WordPress SEO Optimization of Your Website
The next logical step in setting up your website is to organize your pages and posts properly for search engines. In a nutshell, SEO stands for Search Engine Optimization, which is the group of processes of improving your website’s visibility and relevance for search engines like Google or Bing. This process has a direct impact on increasing website traffic, and, ultimately, business success.
Note: WordPress SEO optimization is an ongoing task. It can take months to see the result — a bit of patience, and it will pay off. Thankfully, there are SEO specialists who can help you accelerate the process, develop a sound SEO strategy, and oversee all the stages.

WordPress SEO plugins are tools that help you optimize your website’s content, structure, and performance for SEO. A variety of online tools and utilities can aid you in boosting your page ranking and make it stand out from the competition. Some of the most popular and widely used ones are:
These are comprehensive WordPress plugins that offer various features and functionalities to help you improve your website’s SEO.
Make Sure a Website Is Fast Enough: WordPress Speed Optimization
According to the Google Search Central Blog, website speed is a major ranking factor in search engine results pages (SERPs). Google doesn’t like slow websites because they provide a poor user experience. It affects how users perceive your website, from how quickly images and icons load to your SEO rankings.
According to Kissmetrics research, nearly 40% of people abandon a page if it takes more than 3 seconds to load. Today, visitors prefer lightning-fast websites that allow them to get information as quickly as possible.
So, a question you need to ask is: how can I improve WordPress speed optimization?
First, check your site’s speed using Google Page Speed Insights, Google Analytics, and Google Search Console. These tools will give you insights into how to improve your page speed.

Then, try these ways to optimize your website’s speed:
- updating WordPress core, modules, and themes;
- implementing a content delivery network (CDN);
- optimizing images;
- using a PHP accelerator;
- page caching.
One of the best possible solutions is to install one of the many WordPress caching plugins on your website. Some of the best free caching plugins out there are W3 Total Cache, WP Super Cache, Seraphinite Accelerator. This helps to improve WordPress speed optimization and reduce the overall page loading times.
Secure a Site with a WordPress Security Plugin
Security is a fundamental aspect of any online product. Most websites are vulnerable to hacking attempts, scams, malware, viruses, and other threats. Although WordPress is a secure CMS, it’s important to be vigilant. The best way to keep your website safe is to follow proven security practices.
When you set up your WordPress site, the first thing you should do is buy an SSL security certificate, which demonstrates to visitors how safe and reliable their data connection is. It shows up as a padlock icon in the URL space of your browser. You can see it on the left side of the address bar on this page.

To enhance your website’s defenses, you should also install a WordPress security plugin that provides additional features, such as two-factor authentication password protection. There are many paid and WordPress security plugins available. For example, you can try Sucuri or Wordfence Security, which are industry leaders in website security, vulnerability scanning, and malware protection.
Set Up Google Search Engine & Google Analytics on WordPress
Monitoring traffic statistics and ensuring your website’s visibility in search engines are crucial to getting your site to the top. Google Search Console (GSC) and Google Analytics on WordPress are two free tools provided by Google that help you track, maintain, and enhance your website’s performance and user experience. These tools provide comprehensive insights into your website’s most popular pages, conversion rates, daily visitor count, in-depth user profiles, and more.
Integrating GSC and Google Analytics into your WordPress website provides you with several benefits.
| GSC | GA |
|---|---|
| Verify your website ownership and submit your sitemap so Google can index your website’s content effectively. | Track your website’s visitors and see how they interact with your website. |
| Monitor your website’s indexing and resolve any crawl errors or issues that may impact search engine visibility. | Measure your website’s goals and conversions to assess its performance against your objectives. |
| Analyze your website’s keywords and track your website’s search engine ranking. | Segment your website’s audience to understand how different user groups interact with your website. |
| Optimize your website’s content to enhance its relevance and quality for search engine queries. | Understand your website’s sources to identify how users discover and access your website. |
| Identify and fix any security vulnerabilities or manual penalties that may impact your website’s search ranking. | Enhance your website’s user experience and analyze how users navigate and interact with your website.” |
You can use Google Site Kit or any other plugin like Google Analytics by MonsterInsights to connect your website to Google Search Console and Google Analytics.
What additional steps should you take after launching a new website?
Add Email Capture Form to WordPress
Undoubtedly, every online platform requires a contact form, which enables visitors to connect with the site administrator or owner promptly, subscribe to your email list, and receive valuable content from you. Incorporating an email capture form into your website allows you to expand your email list, foster trust and loyalty among your audience, and boost conversions and sales.

You only need a small space to display the button on the page. Unfortunately, there are no built-in email capture forms on WordPress, so you should look at some contact form plugins. Here are some popular options:
- WPForms enables you to create visually appealing and responsive forms using a drag-and-drop interface.
- OptinMonster assists you in creating various types of email capture forms, including popups, floating bars, slide-ins, inline forms, and more.
- Thrive Leads enables you to create popups, ribbons, widgets, screen fillers, scroll mats, and more.
Integrate one of the aforementioned plugins into your WordPress website, customize it to suit your preferences, and initiate your first interaction with a client.
WordPress SMTP: Control Forms Data & Status of Submitted Emails
Now that your WordPress website is out in the wild, it’s crucial to keep tabs on the data pouring in through your forms and ensure the seamless delivery of crucial emails. Here’s where the magic of WordPress SMTP (Simple Mail Transfer Protocol) comes into play.
Why Does WordPress SMTP Matter?
SMTP is the behind-the-scenes hero ensuring your emails reach their destination. Unlike the default PHP mail function, SMTP adds an extra layer of reliability to email delivery, reducing the likelihood of your messages ending up in spam folders.
To supercharge your forms and email management, consider integrating plugins like:
- Advanced CF7 DB. This powerful plugin enhances Contact Form 7, allowing you to capture and store form submissions effortlessly.
- Contact Form Entries. Streamline form data management with this plugin, ensuring you have a comprehensive record of every submission.
- WP Mail SMTP. Elevate your email game by configuring SMTP settings with this plugin. Say goodbye to email delivery uncertainties.
Configuring WordPress SMTP:
Navigate to your WordPress dashboard, install WP Mail SMTP, and follow the simple setup process. Input your SMTP server details — usually provided by your email service provider — and voila, your emails are on the express route to their destinations.
Monitoring Form Data:
Consider employing tools like the Gravity Forms plugin for a comprehensive view of form entries. It provides an intuitive interface to manage, export, and analyze the data collected through your forms.
Block All Comments On WordPress and Add WordPress Cpntact Form Spam
In this step, we’ll explore effective strategies to block unwanted comments and form submissions from the WordPress site.
Spammy comments and form submissions can clutter your website, diluting the quality of user engagement. To maintain the integrity of your platform, it’s crucial to implement robust defenses.
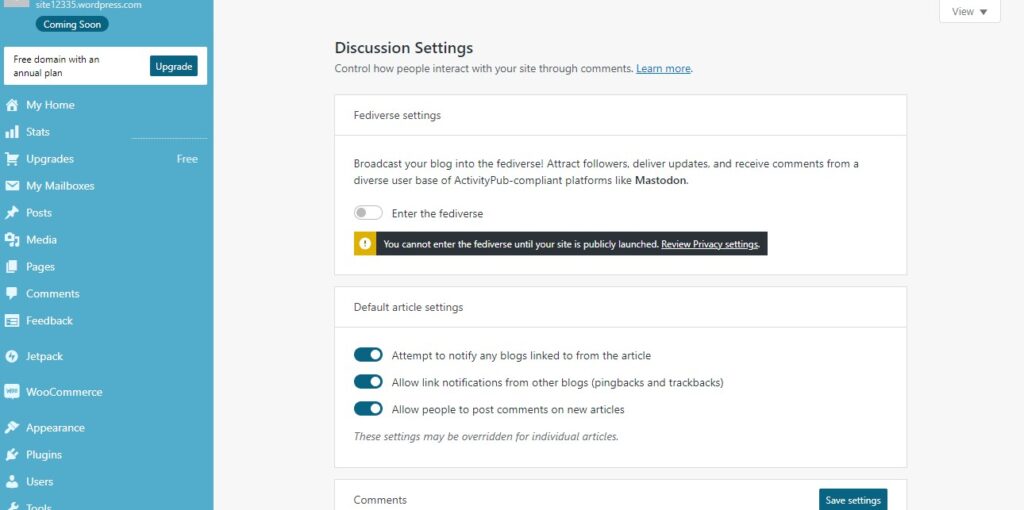
WordPress comes equipped with built-in tools to moderate comments. Go to your Dashboard → Settings → Discussion → enable comment moderation. You can set criteria to hold comments in the moderation queue based on factors like the number of links or specific words.

Enhance your defenses with plugins tailored for the job. Consider plugins like Akismet, which automatically filters out spam comments, sparing you the hassle of sifting through them manually.
Spam bots love to target WordPress contact forms. To thwart their efforts, employ solutions like Google’s reCAPTCHA. This intelligent tool challenges users to prove they’re human before submitting a form, effectively blocking automated spam submissions.
If your website relies on specific form plugins, explore their anti-spam features. For instance, Gravity Forms offers advanced options to combat form spam, ensuring only genuine submissions make their way to your inbox.
Link Your Social Profiles Widgets to a WordPress Website
Today, it is difficult to envision a successful business without an active social media presence. If you create a website, do not forget to link your social media widgets to your site. These small icons or buttons grab the attention of visitors, which leads to:
- Growing your social media audience.
- Boosting your social media traffic.
- Driving more visitors to your website.
- Enhancing your social media credibility.
- Improving your social media SEO and ranking higher in search results.
The way to link your social media widgets to your WordPress website depends on the type of widget and the platform you are using. However, one of the easiest and most common ways is to use a WordPress plugin.
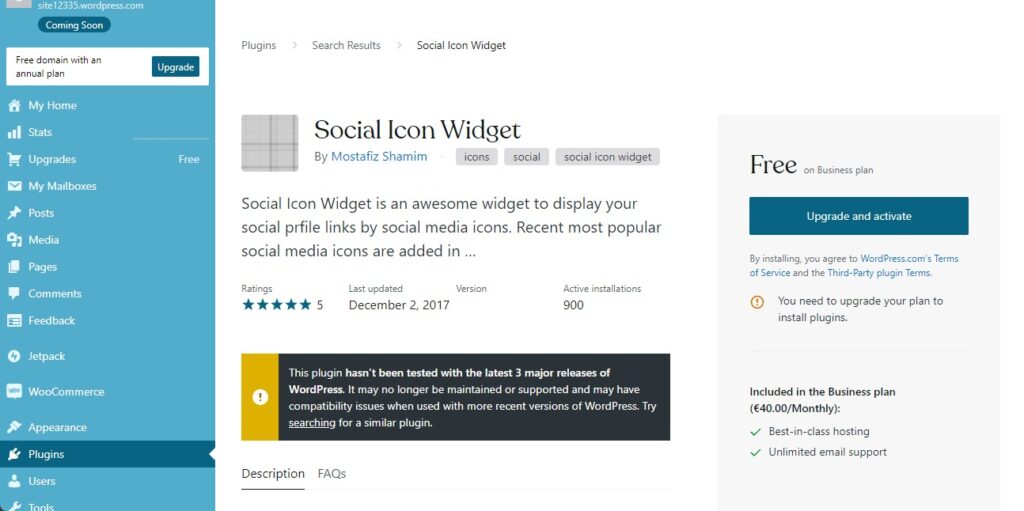
A highly regarded WordPress plugin for social media widgets is the Social Icons Widget. To install and activate the plugin, you need to go to your WordPress dashboard → Plugins → Add New → Social Icons Widget → install and activate it.

Write a Terms & Conditions and WordPress Privacy Policy
Building trust with your audience begins with providing clear guidelines on how you handle their data and what they can expect from your website.
Your Terms & Conditions set the rules for engagement on your website. Cover key aspects such as user responsibilities, content usage policies, and any disclaimers necessary for your specific content or services. Be transparent about what users can and cannot do on your platform.
The Privacy Policy on WordPress is your commitment to safeguarding user information. Outline what data you collect, why you collect it, and how it will be used. Include details on third-party services, cookies, and user rights regarding their data. Make sure to comply with privacy laws applicable to your audience.
Regularly review and update your Terms & Conditions and Privacy Policy to adapt to any changes in your website’s functionality or legal requirements. Keeping these documents current demonstrates your commitment to ethical and transparent practices.
Add a Cookie Consent or WordPress GDPR Notice
We are almost there, guys!
Rule #1: Adding a cookie consent or WordPress GDPR notice. Simply put, it’s a notice that informs your visitors about the use of cookies and other tracking technologies on your website.
Since it can collect personal data about your visitors, such as their IP address, location, device type, and browsing history, you need to obtain their consent and inform them about how you use, store, and protect their data.

Adding a cookie consent or WordPress GDPR plugin, such as CookieYes, GDPR Cookie Consent, or Cookie Notice & Compliance for GDPR / CCPA, to your website can help you comply with the laws and regulations in your country or region. It can also foster trust and transparency with your audience and demonstrate your respect for their privacy and choices.
Summing Up
Building a website on WordPress or any other CMS is a process that has no ending. As we said earlier, the real work only starts after the launch. When you run a new platform, you should be ready that it will require a lot of resources after creating too. However, a well-built website gets a good return for scaling and growth — which is one of the main goals of any business.
These days, it is crucial for businesses to have a beautiful site with responsive web design. It must be dynamic and functional, represent the brand, and share the company’s values. The list above is helpful as it contains the fundamental things to do after launching a WordPress site.
For website owners who want to ensure their online stores, blogs, portals, and so on are running at peak efficiency, feel free to contact Webcapitan. You can always enlist the help of experts from our web development company to get moving quickly.


